Spring 비동기 처리의 이해 5(Webflux with R2DBC, 게시판 만들기)
by Glenn
이번엔 MySQL DB를 추가하고, thymeleaf를 사용하여 View를 추가하도록 하겠습니다.
Library 추가
build.gradle에 mysql driver, thymeleaf Library를 추가해줍니다.
implementation 'org.springframework.boot:spring-boot-starter-thymeleaf'
implementation 'dev.miku:r2dbc-mysql'
MySQL Table 생성 및 데이터 추가
create table users (
    id BIGINT AUTO_INCREMENT NOT NULL,
    `name` VARCHAR(50) NOT NULL,
    age INT NOT NULL,
    profile_picture_url VARCHAR(200) NULL,
    updated_at datetime NOT NULL,
    created_at datetime NOT NULL,
    PRIMARY KEY (id)
);

insert into users (name, age, profile_picture_url, updated_at, created_at) values ('user1', 10, null, now(), now());
insert into users (name, age, profile_picture_url, updated_at, created_at) values ('user2', 20, null, now(), now());
insert into users (name, age, profile_picture_url, updated_at, created_at) values ('user3', 30, null, now(), now());

create table boards (
    id BIGINT AUTO_INCREMENT NOT NULL,
    title VARCHAR(500) NOT NULL,
    content VARCHAR(4000) NOT NULL,
    updated_at datetime NOT NULL,
    created_at datetime NOT NULL,
    PRIMARY KEY (id)
);

insert into boards (title, content, updated_at, created_at) values ('Title 1', 'Content1', now(), now());
insert into boards (title, content, updated_at, created_at) values ('Title 2', 'Content2', now(), now());
insert into boards (title, content, updated_at, created_at) values ('Title 3', 'Content3', now(), now());
MySQL 접속정보 Properties 추가
--- 을 추가하면 profiles를 구분할수 있습니다.
spring:
  profiles: h2
  h2:
    console:
      enabled: true
      path: /h2-console

webclient.h2-console-port: 8081

---

spring:
  profiles: mysql
  r2dbc:
    url: r2dbc:mysql://localhost:3306/jpa_study?useUnicode=true&characterEncoding=utf8
    username: {username}
    password: {password}
MySQL Config 추가
r2dbc/config에 MySqlR2dbcConfig 클래스 추가
package com.example.r2dbc.config;

import org.springframework.context.annotation.Configuration;
import org.springframework.context.annotation.Profile;
import org.springframework.data.r2dbc.config.EnableR2dbcAuditing;
import org.springframework.data.r2dbc.repository.config.EnableR2dbcRepositories;

@Profile("mysql")
@EnableR2dbcAuditing
@EnableR2dbcRepositories
@Configuration
public class MySqlR2dbcConfig {}
Profile를 구분한것 외에 특별한 설정은 없지만,
@EnableR2dbcAuditing, @EnableR2dbcRepositories을 위해 추가하였습니다.
UserViewController 추가
controller 패키지 아래에 UserViewController을 추구합니다.
package com.example.r2dbc.controller;

import com.example.r2dbc.model.User;
import com.example.r2dbc.service.UserService;

import org.springframework.stereotype.Controller;
import org.springframework.ui.Model;
import org.springframework.web.bind.annotation.GetMapping;
import org.thymeleaf.spring5.context.webflux.IReactiveDataDriverContextVariable;
import org.thymeleaf.spring5.context.webflux.ReactiveDataDriverContextVariable;

import java.time.Duration;

import lombok.RequiredArgsConstructor;
import reactor.core.publisher.Flux;

@RequiredArgsConstructor
@Controller
public class UserViewController {
    private final UserService userService;

    @GetMapping("/")
    public String index(Model model) {
        Flux<User> users = userService.findAll().delayElements(Duration.ofSeconds(1));
        IReactiveDataDriverContextVariable userDataDrivenMode = new ReactiveDataDriverContextVariable(users, 1);

        model.addAttribute("users", userDataDrivenMode);

        return "index";
    }
}
delayElements는 Publishing되는 아이템을 지정한 시간만큼 지연시킵니다.
(ReactiveDataDriverContextVariable의 기능을 보여주기위해 억지로 추가하였습니다.)
View 추가
resources 디렉토리 아래에 template 디렉토리를 만들고 index.html을 추가합니다.
클래스패스내에 spring-boot-starter-thymeleaf가 존재하면
Springboot의 Auto Configuration으로 인하여 View Resolver설정을 따로 하지않아도
손쉽게 사용할수 있습니다.
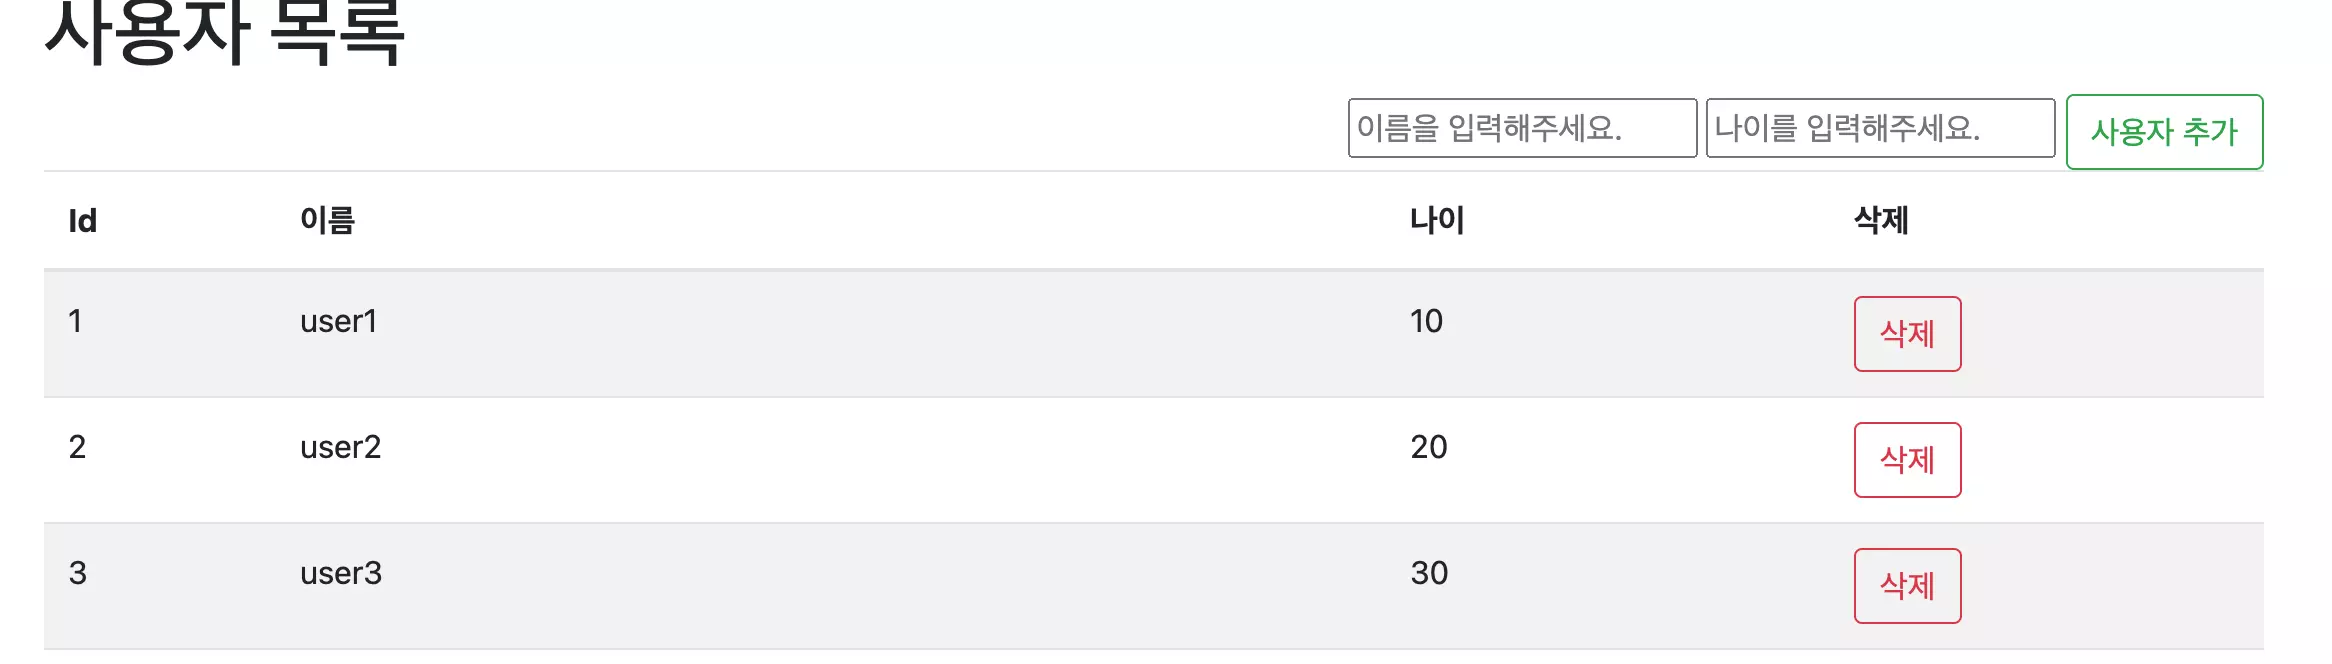
Profiles를 mysql로 변경후 실행
http://localhost:8080으로 접속하여
다음과 같은 화면이 정상적으로 나오는지 확인
Subscribe via RSS